Deepkit 프레임워크
Deepkit 프레임워크는 @deepkit/app의 Deepkit App을 기반으로 하며, 애플리케이션에 가져와 사용할 수 있는 @deepkit/framework의 FrameworkModule 모듈을 제공합니다.
App 추상화는 다음을 제공합니다:
- CLI 명령
- 구성 로딩(환경, dotfiles, 사용자 지정)
- 모듈 시스템
- 강력한 서비스 컨테이너
- 컨트롤러, 프로바이더, 리스너 등용 레지스트리와 훅
FrameworkModule 모듈은 다음과 같은 추가 기능을 제공합니다:
- 애플리케이션 서버
- HTTP 서버
- RPC 서버
- 다중 프로세스 로드 밸런싱
- SSL
- 디버깅 CLI 명령
- 데이터베이스 마이그레이션 구성/명령
{debug: true}옵션을 통한 디버깅/프로파일러 GUI- 대화형 API 문서화(Swagger 유사)
- DatabaseRegistry, ProcessLocking, Broker, Sessions용 프로바이더
- 통합 테스트 API
FrameworkModule 유무와 관계없이 애플리케이션을 작성할 수 있습니다.
설치
Deepkit 프레임워크는 Deepkit App을 기반으로 합니다. 해당 설치 안내를 먼저 따랐는지 확인하세요.
그렇다면 Deepkit 프레임워크를 설치하고 App에 FrameworkModule을 가져와(import) 사용할 수 있습니다.
npm install @deepkit/framework
import { App } from '@deepkit/app';
import { FrameworkModule } from '@deepkit/framework';

const app = new App({
    imports: [new FrameworkModule({ debug: true })]
});

app.command('test', (logger: Logger) => {
    logger.log('Hello World!');
});

app.run();
이제 애플리케이션이 FrameworkModule을 가져왔으므로, 주제별로 묶인 더 많은 명령이 사용 가능함을 볼 수 있습니다.
그중 하나는 HTTP 서버를 시작하는 server:start입니다. 이를 사용하려면 최소 한 개의 HTTP 라우트를 등록해야 합니다.
import { App } from '@deepkit/app';
import { HttpRouterRegistry } from '@deepkit/http';

const app = new App({
    imports: [new FrameworkModule({ debug: true })]
});

app.command('test', (logger: Logger) => {
    logger.log('Hello World!');
});


const router = app.get(HttpRouterRegistry);

router.get('/', () => {
    return 'Hello World';
})

app.run();
server:start 명령을 다시 실행하면 HTTP 서버가 시작되고 / 라우트가 사용 가능함을 확인할 수 있습니다.
$ ./node_modules/.bin/ts-node ./app.ts server:start
$ curl http://localhost:8080/
Hello World
요청을 처리하는 방법은 HTTP 또는 RPC 장을 참조하세요. App 장에서 CLI 명령에 대해 더 자세히 배울 수 있습니다.
App
App 클래스는 애플리케이션의 주요 진입점입니다. 모든 모듈과 구성을 로딩하고 애플리케이션을 시작하는 역할을 합니다.
또한 모든 CLI 명령을 로딩하고 실행하는 역할도 합니다. FrameworkModule과 같은 모듈은 추가 명령을 제공하고, 이벤트 리스너를 등록하며,
HTTP/RPC용 컨트롤러, 서비스 프로바이더 등을 제공합니다.
이 app 객체는 CLI 컨트롤러를 실행하지 않고도 의존성 주입 컨테이너에 접근하는 데 사용할 수 있습니다.
const app = new App({
    imports: [new FrameworkModule]
});

//등록된 모든 서비스에 접근하기
const eventDispatcher = app.get(EventDispatcher);
FrameworkModule이 다른 많은 것들(Logger, ApplicationServer, 그리고 더 많은 것들)과 마찬가지로 이를 서비스 프로바이더로 등록하므로 EventDispatcher를 가져올 수 있습니다.
고유한 서비스를 등록할 수도 있습니다.
class MyService {
    constructor(private logger: Logger) {
    }

    helloWorld() {
        this.logger.log('Hello World');
    }
}

const app = new App({
    providers: [MyService],
    imports: [new FrameworkModule]
});

const service = app.get(MyService);

service.helloWorld();
디버거
애플리케이션 및 모든 모듈의 구성 값을 디버거에서 확인할 수 있습니다. FrameworkModule에서 debug 옵션을 활성화하고 http://localhost:8080/_debug/configuration을 열어보세요.
import { App } from '@deepkit/app';
import { FrameworkModule } from '@deepkit/framework';

new App({
    config: Config,
    controllers: [MyWebsite],
    imports: [
        new FrameworkModule({
            debug: true,
        })
    ]
}).run();
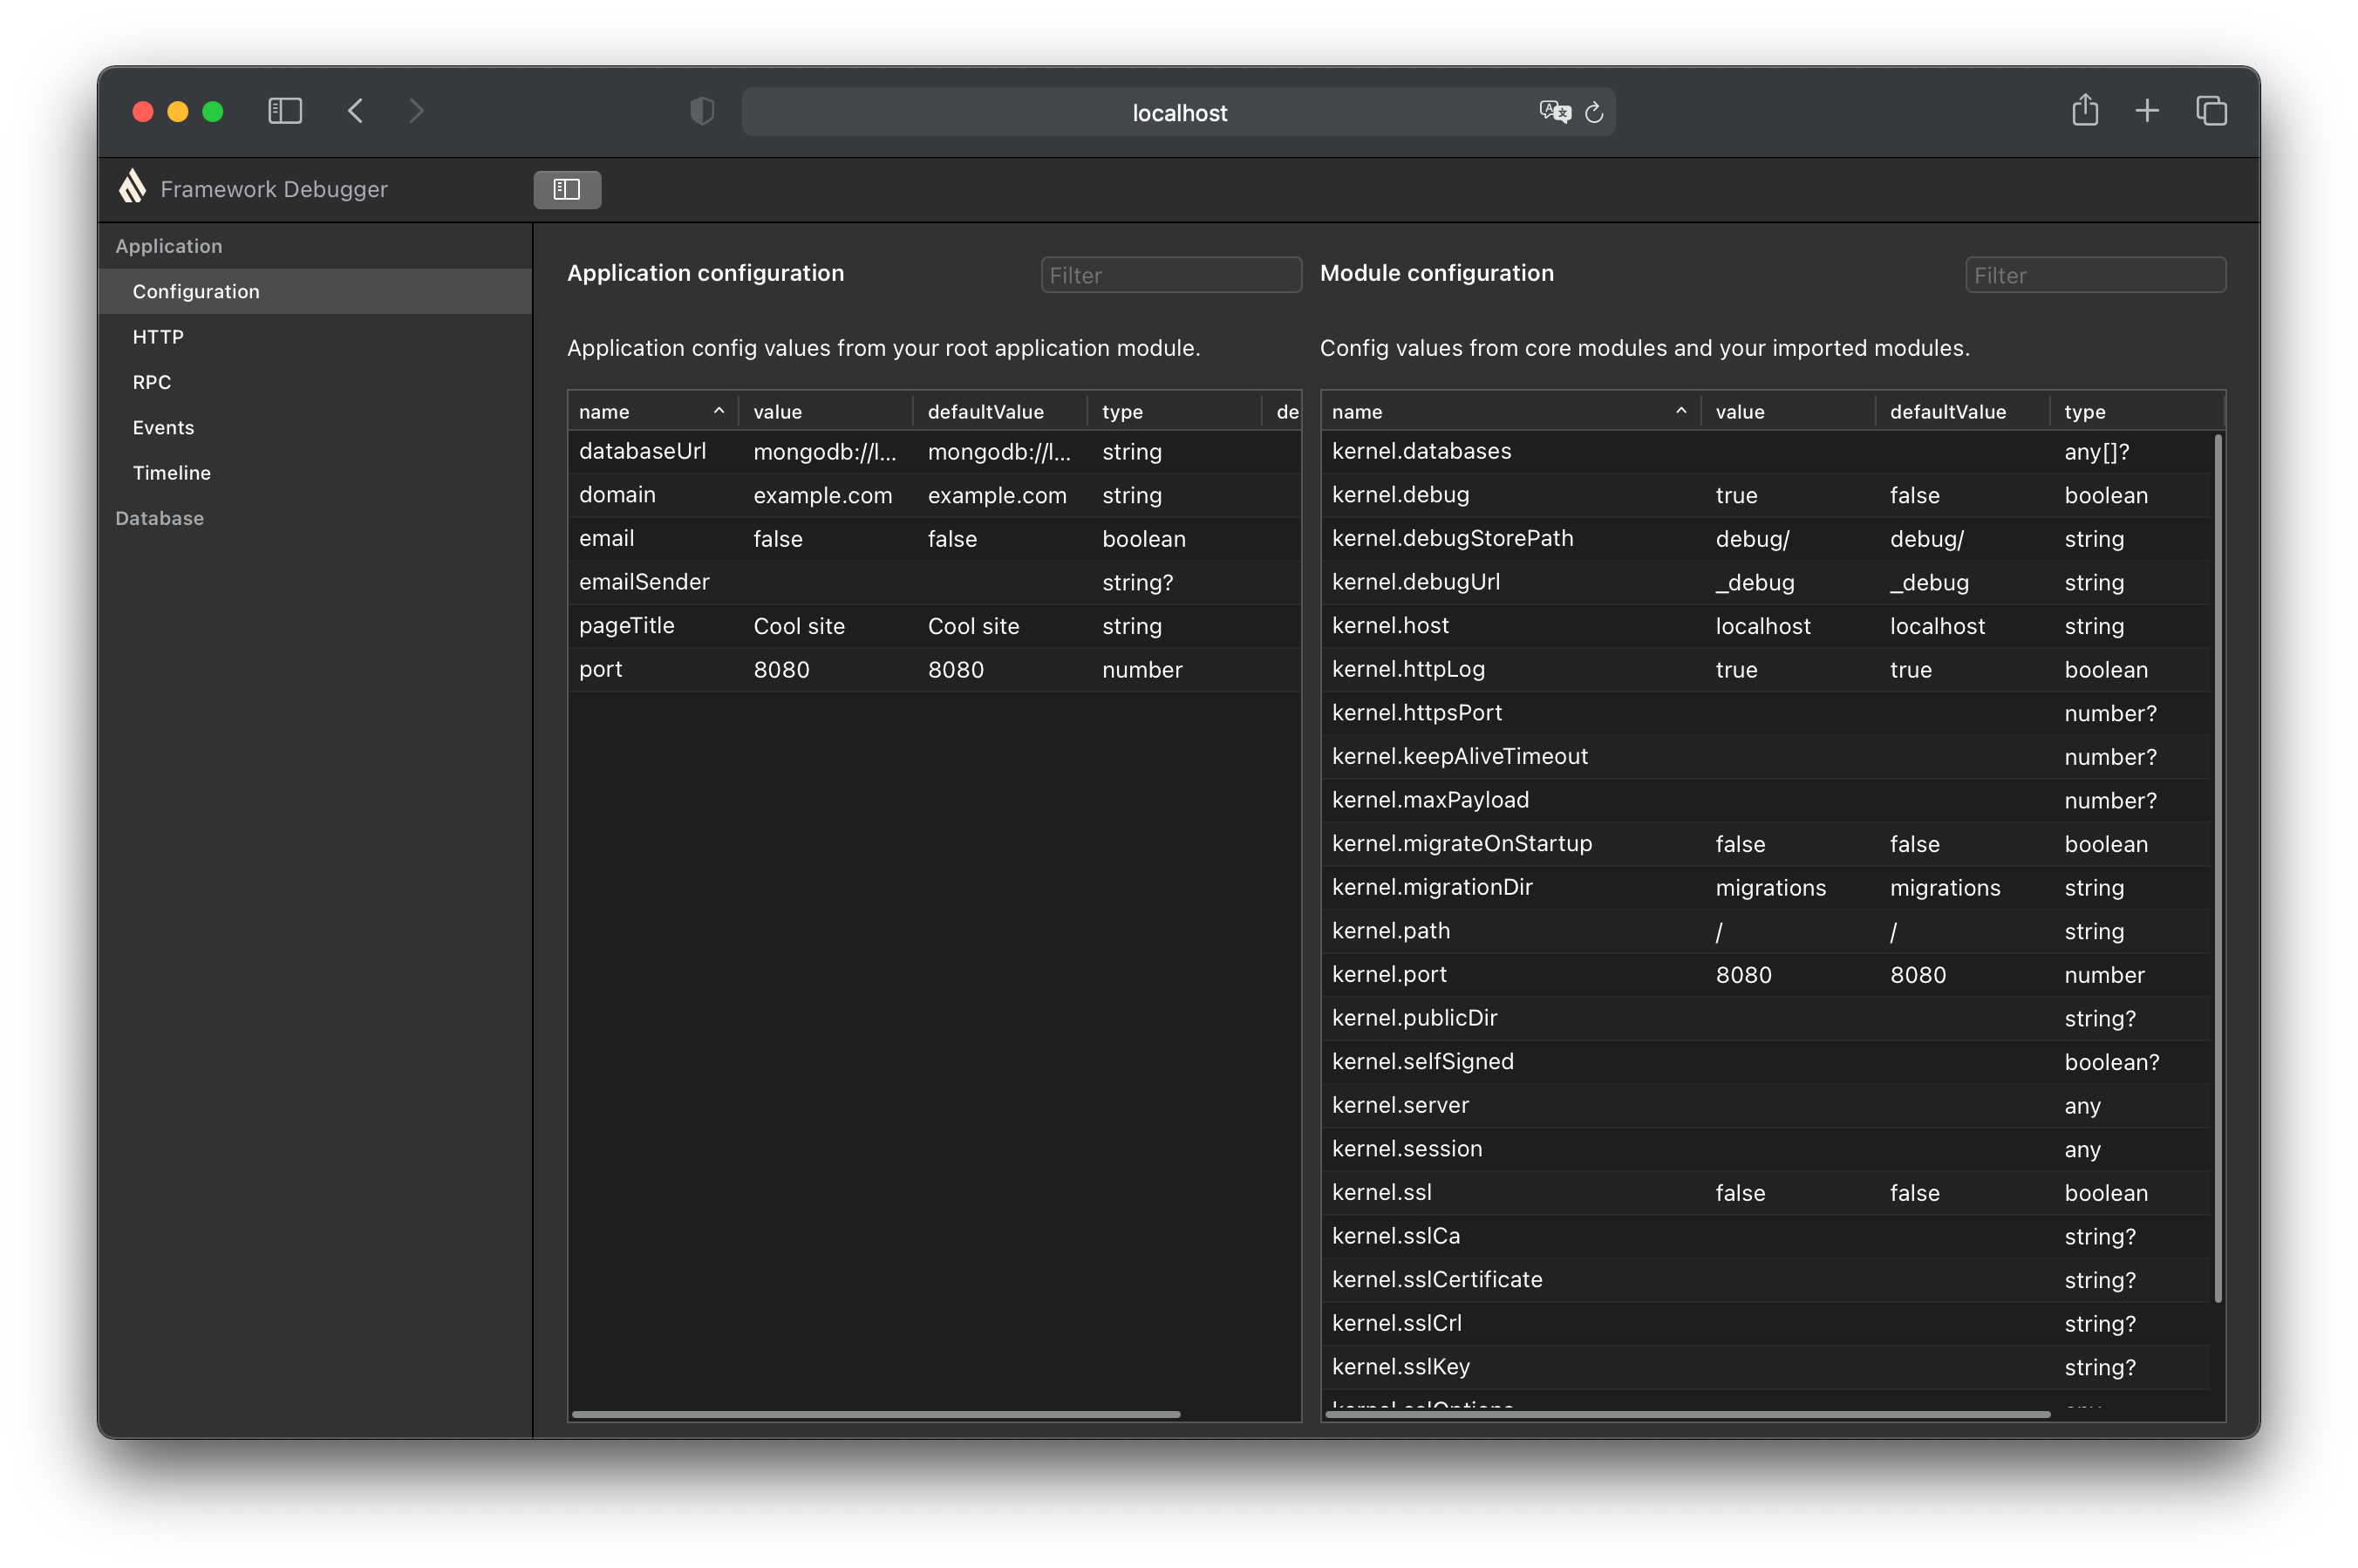
ts-node app.ts app:config를 사용하여 사용 가능한 모든 구성 옵션, 활성 값, 기본값, 설명 및 데이터 타입을 표시할 수도 있습니다.
$ ts-node app.ts app:config
Application config
┌─────────┬───────────────┬────────────────────────┬────────────────────────┬─────────────┬───────────┐
│ (index) │     name      │         value          │      defaultValue      │ description │   type    │
├─────────┼───────────────┼────────────────────────┼────────────────────────┼─────────────┼───────────┤
│    0    │  'pageTitle'  │     'Other title'      │      'Cool site'       │     ''      │ 'string'  │
│    1    │   'domain'    │     'example.com'      │     'example.com'      │     ''      │ 'string'  │
│    2    │    'port'     │          8080          │          8080          │     ''      │ 'number'  │
│    3    │ 'databaseUrl' │ 'mongodb://localhost/' │ 'mongodb://localhost/' │     ''      │ 'string'  │
│    4    │    'email'    │         false          │         false          │     ''      │ 'boolean' │
│    5    │ 'emailSender' │       undefined        │       undefined        │     ''      │ 'string?' │
└─────────┴───────────────┴────────────────────────┴────────────────────────┴─────────────┴───────────┘
Modules config
┌─────────┬──────────────────────────────┬─────────────────┬─────────────────┬────────────────────────────────────────────────────────────────────────────────────────────────────┬────────────┐
│ (index) │           name               │      value      │  defaultValue   │                                            description                                             │    type    │
├─────────┼──────────────────────────────┼─────────────────┼─────────────────┼────────────────────────────────────────────────────────────────────────────────────────────────────┼────────────┤
│    0    │       'framework.host'       │   'localhost'   │   'localhost'   │                                                 ''                                                 │  'string'  │
│    1    │       'framework.port'       │      8080       │      8080       │                                                 ''                                                 │  'number'  │
│    2    │    'framework.httpsPort'     │    undefined    │    undefined    │ 'If httpsPort and ssl is defined, then the https server is started additional to the http-server.' │ 'number?'  │
│    3    │    'framework.selfSigned'    │    undefined    │    undefined    │           'If for ssl: true the certificate and key should be automatically generated.'            │ 'boolean?' │
│    4    │ 'framework.keepAliveTimeout' │    undefined    │    undefined    │                                                 ''                                                 │ 'number?'  │
│    5    │       'framework.path'       │       '/'       │       '/'       │                                                 ''                                                 │  'string'  │
│    6    │     'framework.workers'      │        1        │        1        │                                                 ''                                                 │  'number'  │
│    7    │       'framework.ssl'        │      false      │      false      │                                       'Enables HTTPS server'                                       │ 'boolean'  │
│    8    │    'framework.sslOptions'    │    undefined    │    undefined    │                   'Same interface as tls.SecureContextOptions & tls.TlsOptions.'                   │   'any'    │
...
애플리케이션 서버
파일 구조
자동 CRUD
이벤트
Deepkit 프레임워크에는 이벤트 리스너를 등록할 수 있는 다양한 이벤트 토큰이 포함되어 있습니다.
이벤트 동작 방식에 대한 자세한 내용은 이벤트 장을 참고하세요.
이벤트 디스패치
이벤트는 EventDispatcher 클래스 통해 전송됩니다. Deepkit 앱에서는 의존성 주입을 통해 이를 제공받을 수 있습니다.
import { cli, Command } from '@deepkit/app';
import { EventDispatcher } from '@deepkit/event';

@cli.controller('test')
export class TestCommand implements Command {
    constructor(protected eventDispatcher: EventDispatcher) {
    }

    async execute() {
        this.eventDispatcher.dispatch(UserAdded, new UserEvent({ username: 'Peter' }));
    }
}